> ## Documentation Index
> Fetch the complete documentation index at: https://stackone-hub-mintlify-faq-auth-1778741320.mintlify.site/llms.txt
> Use this file to discover all available pages before exploring further.

# Ashby Background Check

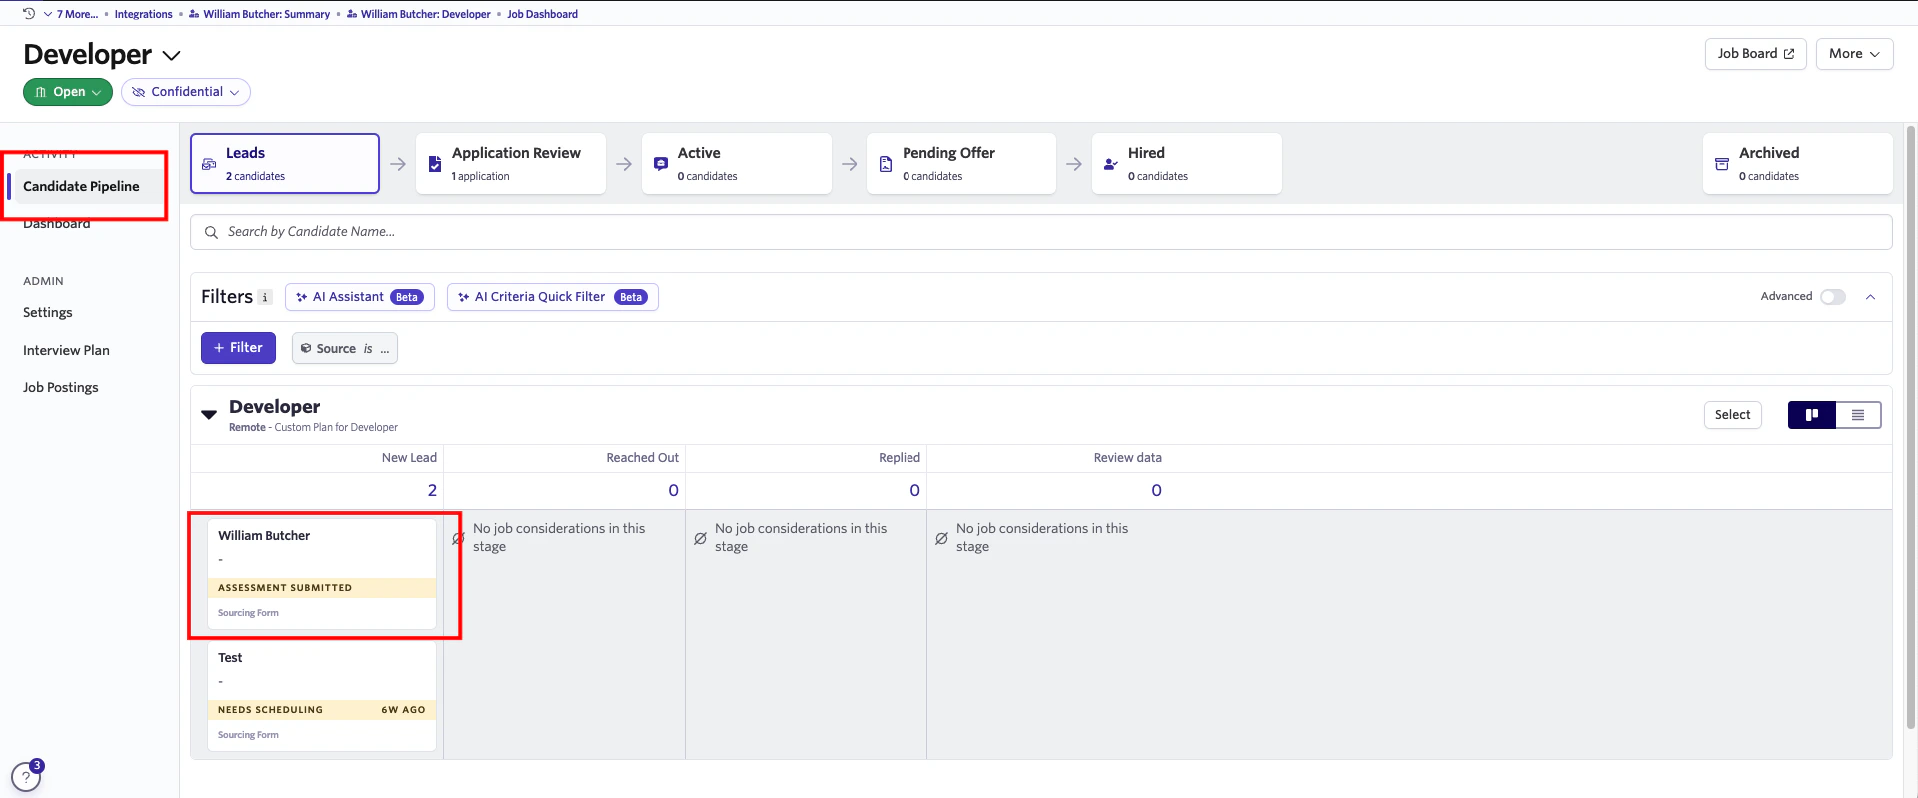
> To successfully send test notifications from Ashby, follow these steps in your Ashby account, and complete the necessary actions.

<Warning>
  The following guidance assumes you have Admin privileges for your Ashby
  account.
</Warning>

## To Get External Trigger Token

<Steps>
  <Step title="To get the External Trigger Token">
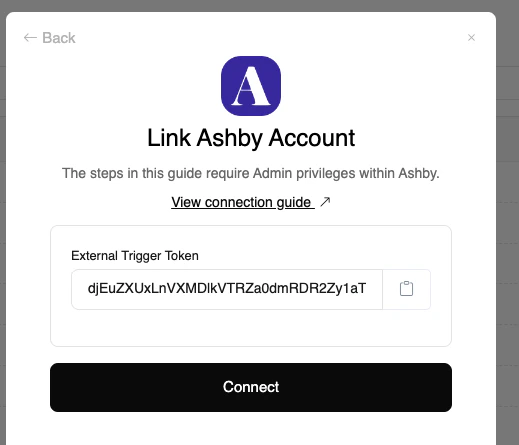
    From the StackOne hub, you will receive the `External Trigger Token` needed to enable the Ashby Integration.
    <Frame>
      <img className="rounded-md" style={{ margin: '0 auto', border: '1px solid #efefef' }} alt="Maintain Assessment Status" src="https://mintcdn.com/stackone-hub-mintlify-faq-auth-1778741320/cy-y7wycMjlCcgtS/images/ashby-background-check/ashby-external-key.png?fit=max&auto=format&n=cy-y7wycMjlCcgtS&q=85&s=1d969434bbcd8b3cc64dd68d20561569" width="519" height="445" data-path="images/ashby-background-check/ashby-external-key.png" />
    </Frame>
  </Step>
</Steps>

## To enable the integration on your Ashby account

<Steps>
  <Step title="Go to Integration">
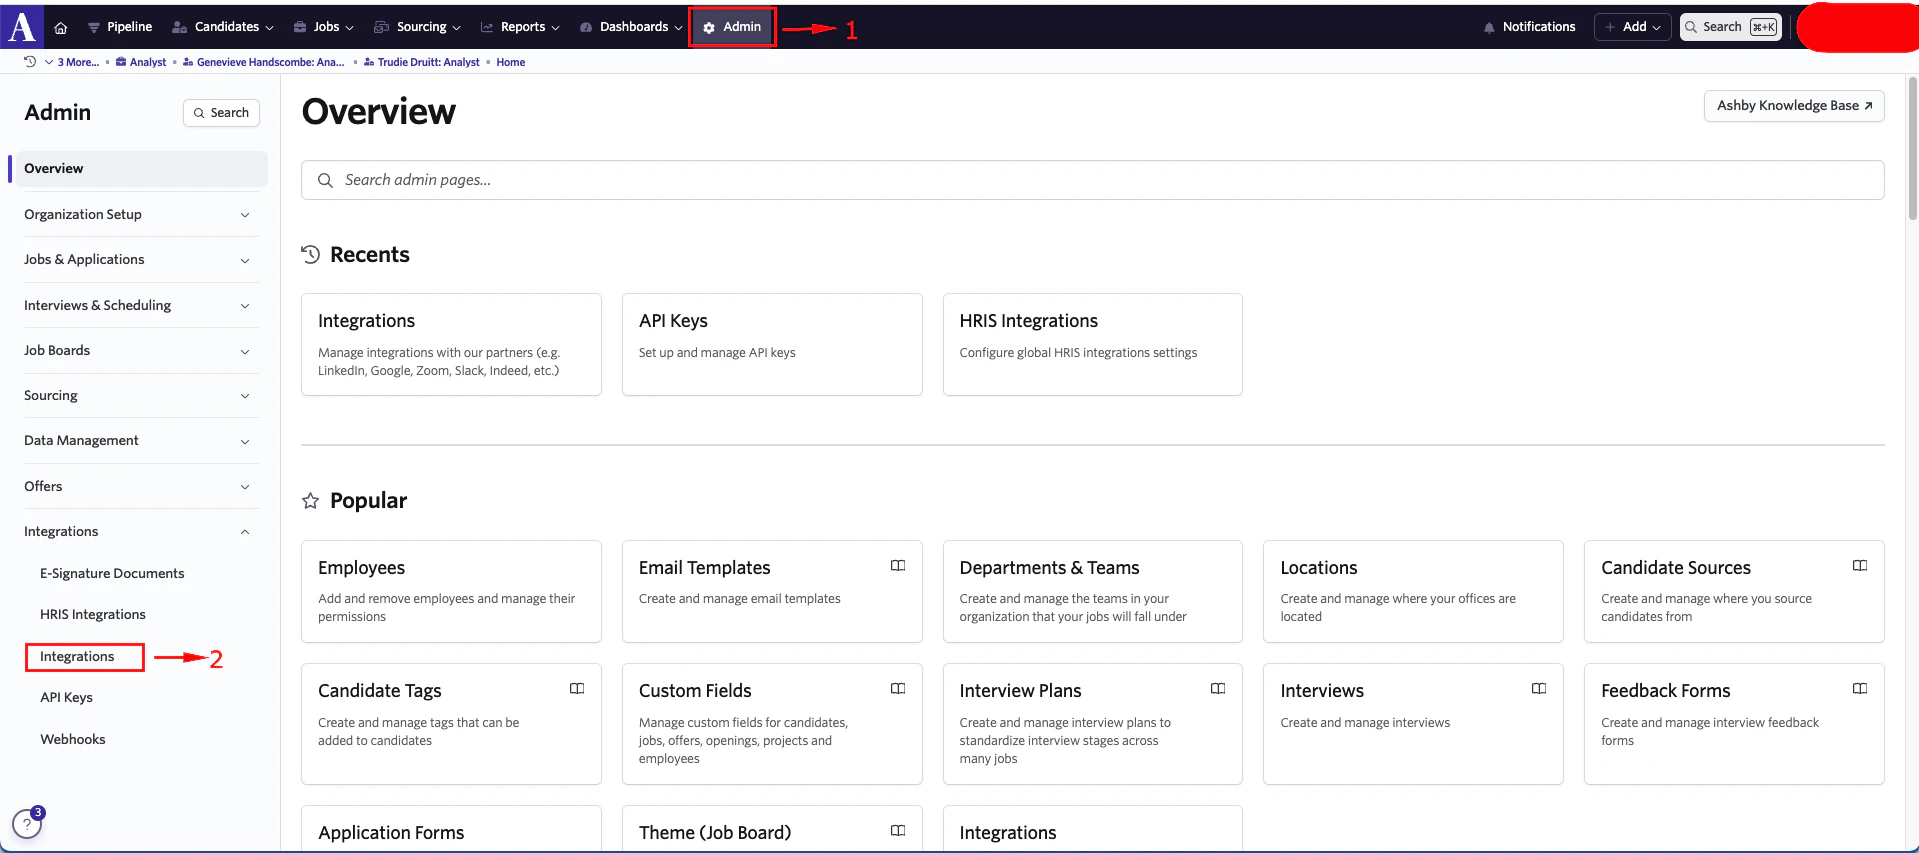
    Please navigate to `Admin` in Ashby’s dashboard. Then navigate to `Integrations` and click on it
    <Frame>
      <img className="rounded-md" style={{ margin: '0 auto', border: '1px solid #efefef' }} alt="Maintain Assessment Status" src="https://mintcdn.com/stackone-hub-mintlify-faq-auth-1778741320/cy-y7wycMjlCcgtS/images/ashby-background-check/ashby-bcheck-1.png?fit=max&auto=format&n=cy-y7wycMjlCcgtS&q=85&s=e64e7c4c838c79ccf40a16eec8a4eba2" width="1919" height="853" data-path="images/ashby-background-check/ashby-bcheck-1.png" />
    </Frame>
  </Step>

  <Step title="To enable the Stackone integration">
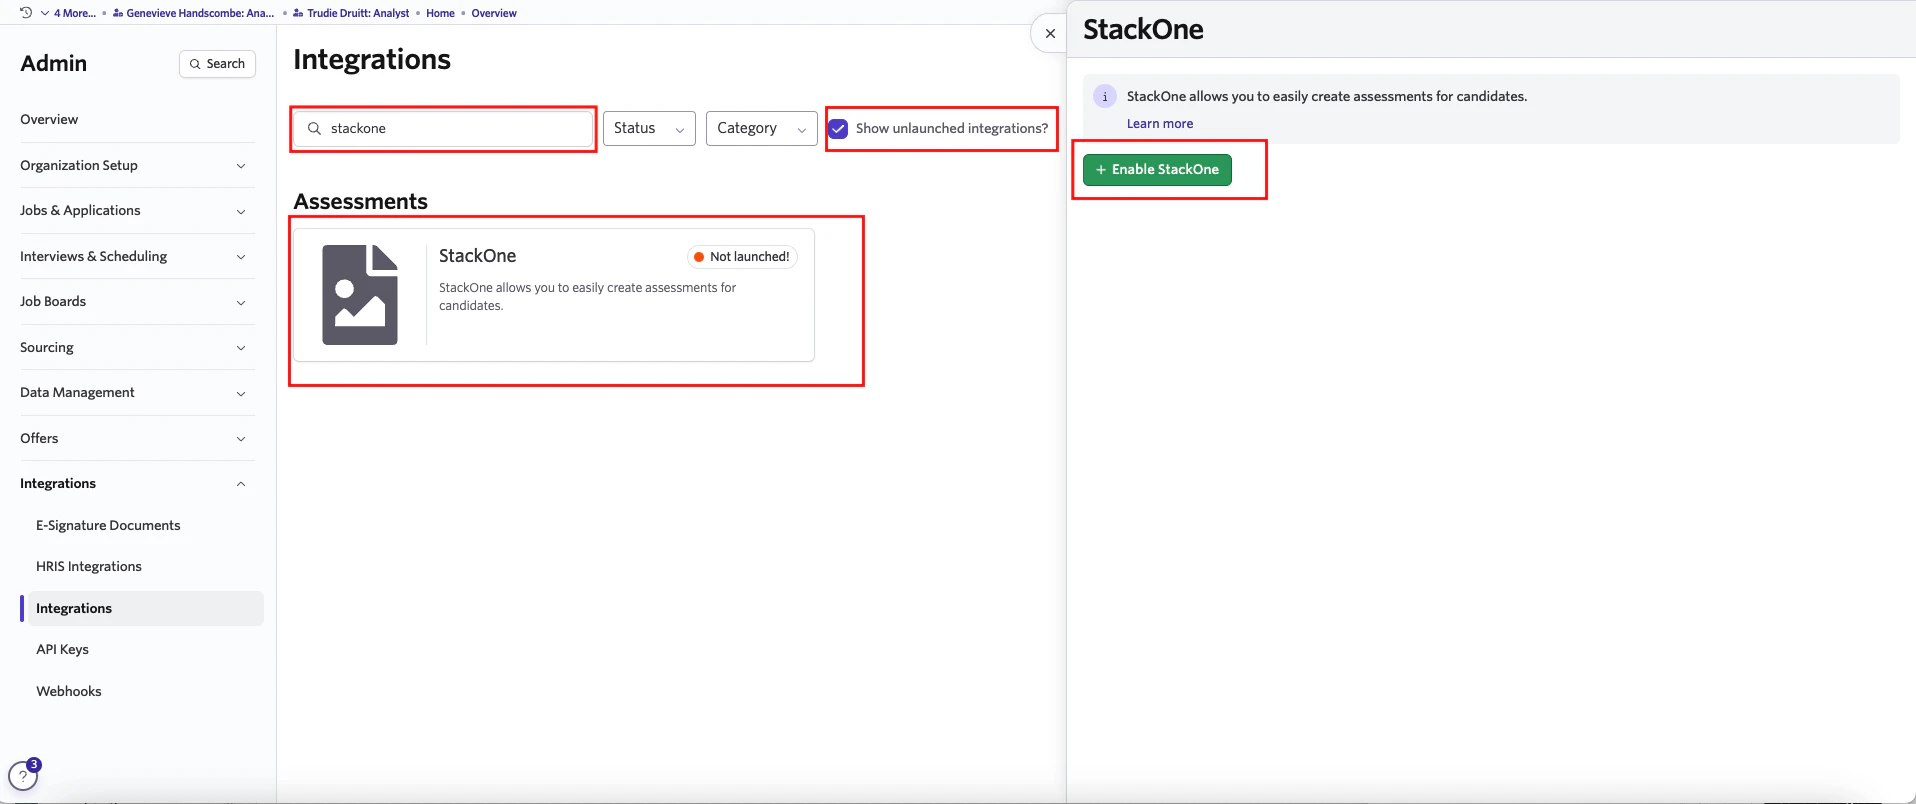
    Check the Show unlaunched integrations flag, search for `Stackone` Integration and click on the integration as shown below. A pop up for enabling the `Stackone` integration will appear. Click on Enable `Stackone` integrations.
    <Frame>
      <img className="rounded-md" style={{ margin: '0 auto', border: '1px solid #efefef' }} alt="Edit/View Assessment/Background check Status ID" src="https://mintcdn.com/stackone-hub-mintlify-faq-auth-1778741320/cy-y7wycMjlCcgtS/images/ashby-background-check/ashby-bcheck-2.png?fit=max&auto=format&n=cy-y7wycMjlCcgtS&q=85&s=d59b00ce2ab6d777e4153dbe20f55f1f" width="1916" height="804" data-path="images/ashby-background-check/ashby-bcheck-2.png" />
    </Frame>

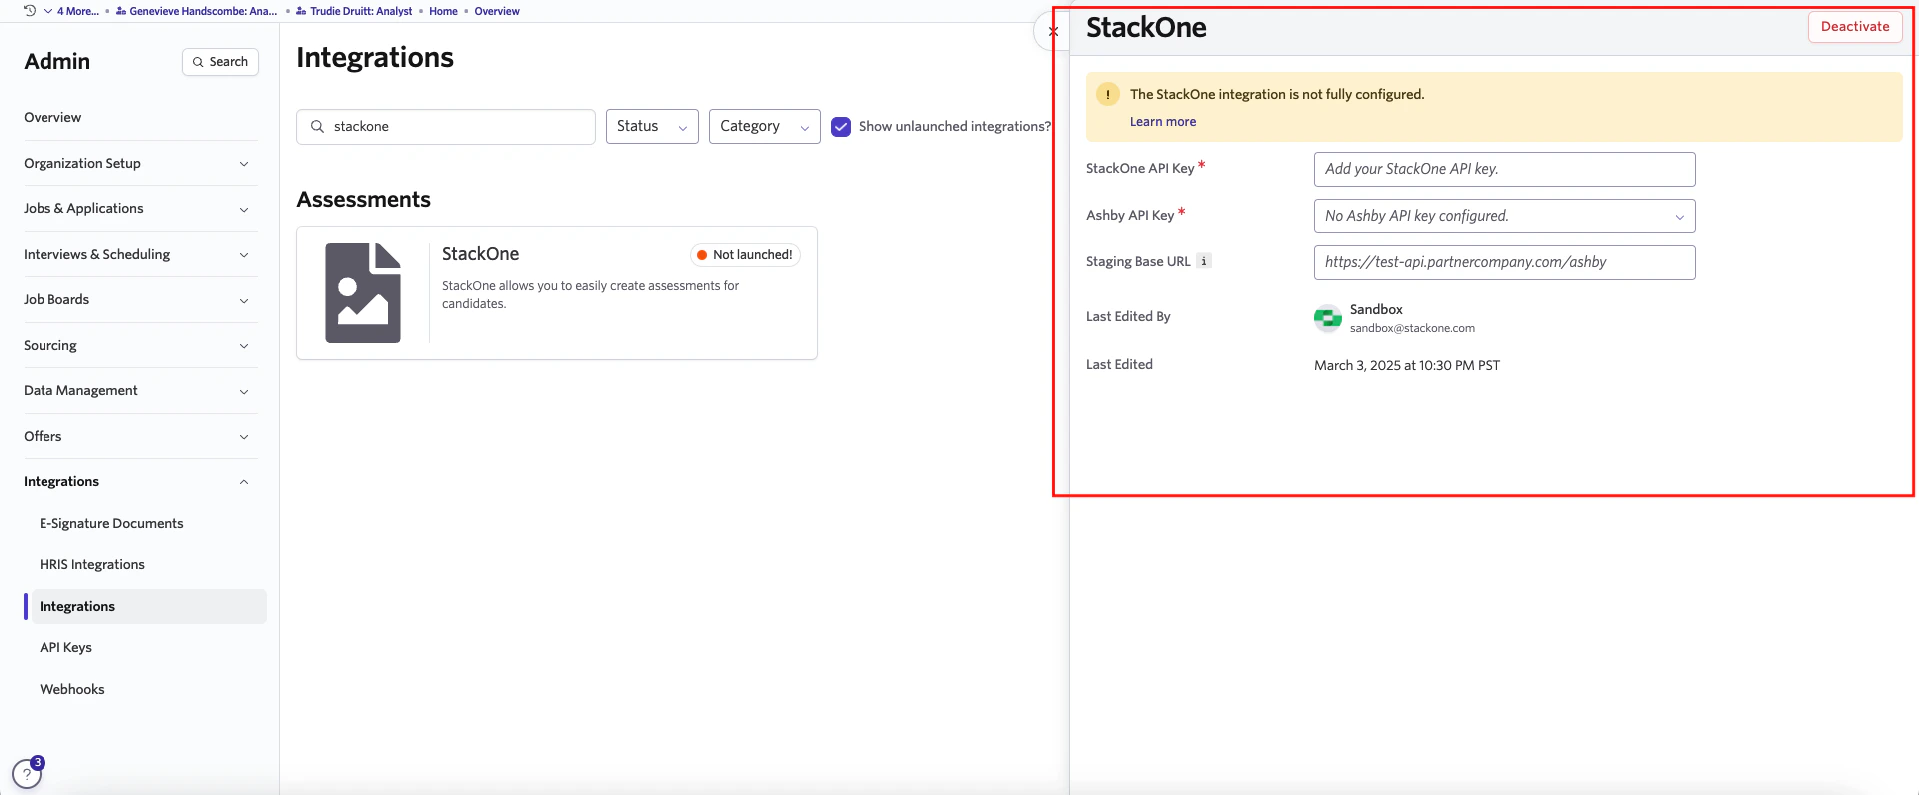
    Once you enable the integration, a pop-up will appear, prompting you to fill in the required fields shown below.
    <Frame>
      <img className="rounded-md" style={{ margin: '0 auto', border: '1px solid #efefef' }} alt="Edit/View Assessment/Background check Status ID" src="https://mintcdn.com/stackone-hub-mintlify-faq-auth-1778741320/cy-y7wycMjlCcgtS/images/ashby-background-check/ashby-bcheck-3.png?fit=max&auto=format&n=cy-y7wycMjlCcgtS&q=85&s=61d20a9994ad7ddf6601da88280ea375" width="1919" height="795" data-path="images/ashby-background-check/ashby-bcheck-3.png" />
    </Frame>

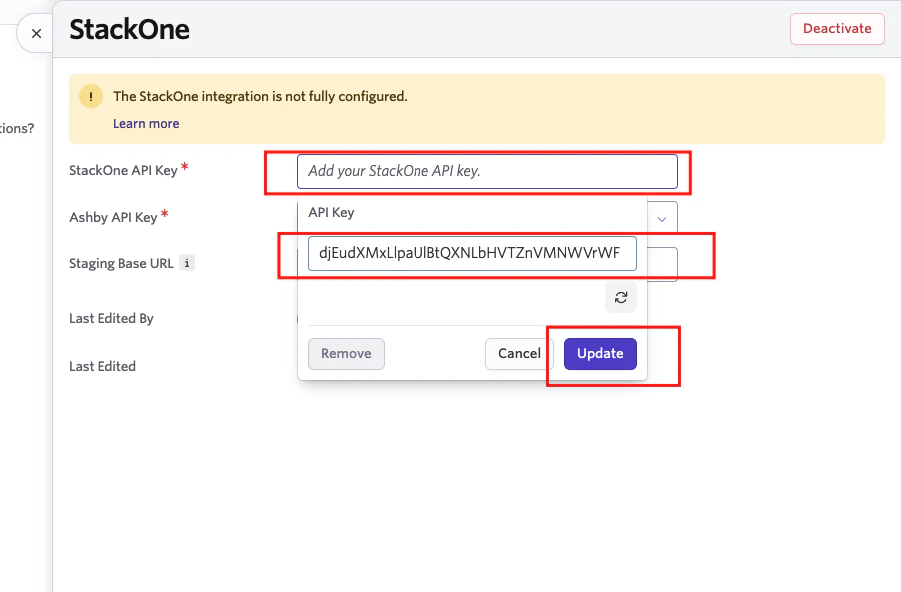
    Please click on `StackOne API Key`. An input field will appear, allowing you to enter the `External Trigger Token` provided by the StackOne Hub. After entering the `External Trigger Token`, click Update.
    <Frame>
      <img className="rounded-md" style={{ margin: '0 auto', border: '1px solid #efefef' }} alt="Edit/View Assessment/Background check Status ID" src="https://mintcdn.com/stackone-hub-mintlify-faq-auth-1778741320/cy-y7wycMjlCcgtS/images/ashby-background-check/ashby-bcheck-4.png?fit=max&auto=format&n=cy-y7wycMjlCcgtS&q=85&s=193bd951955181bf74ecd62515d970c3" width="901" height="592" data-path="images/ashby-background-check/ashby-bcheck-4.png" />
    </Frame>

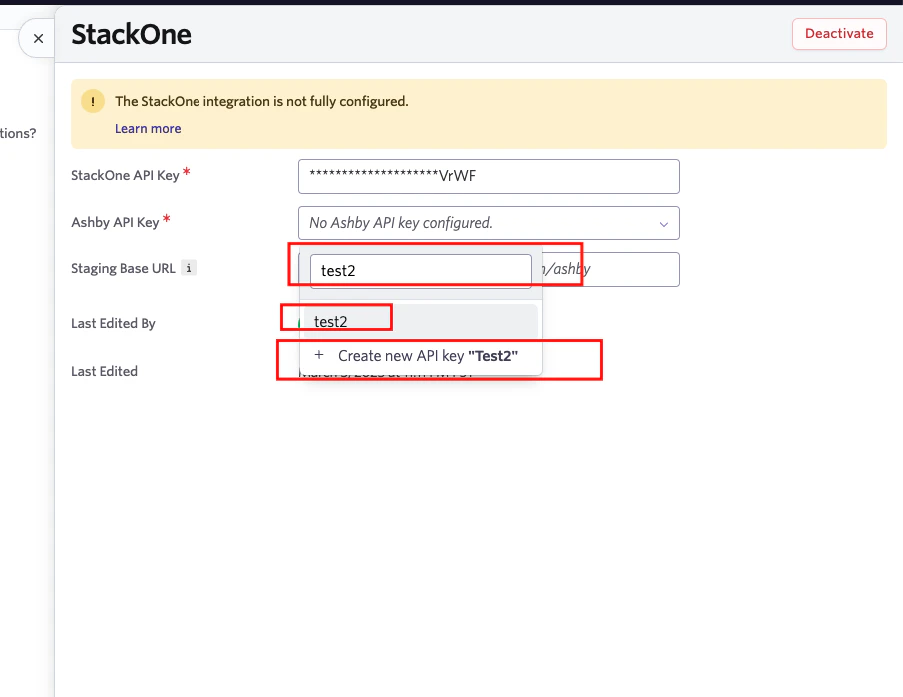
    Please click on `Ashby API Key`. A search bar will appear, allowing you to enter the name of an existing Ashby API Key. If you want to use an existing one, select it; otherwise, click Create New API Key.
    <Frame>
      <img className="rounded-md" style={{ margin: '0 auto', border: '1px solid #efefef' }} alt="Edit/View Assessment/Background check Status ID" src="https://mintcdn.com/stackone-hub-mintlify-faq-auth-1778741320/cy-y7wycMjlCcgtS/images/ashby-background-check/ashby-bcheck-5.png?fit=max&auto=format&n=cy-y7wycMjlCcgtS&q=85&s=d2c9aac2e7e99ec60fc801dadeeda9df" width="903" height="697" data-path="images/ashby-background-check/ashby-bcheck-5.png" />
    </Frame>

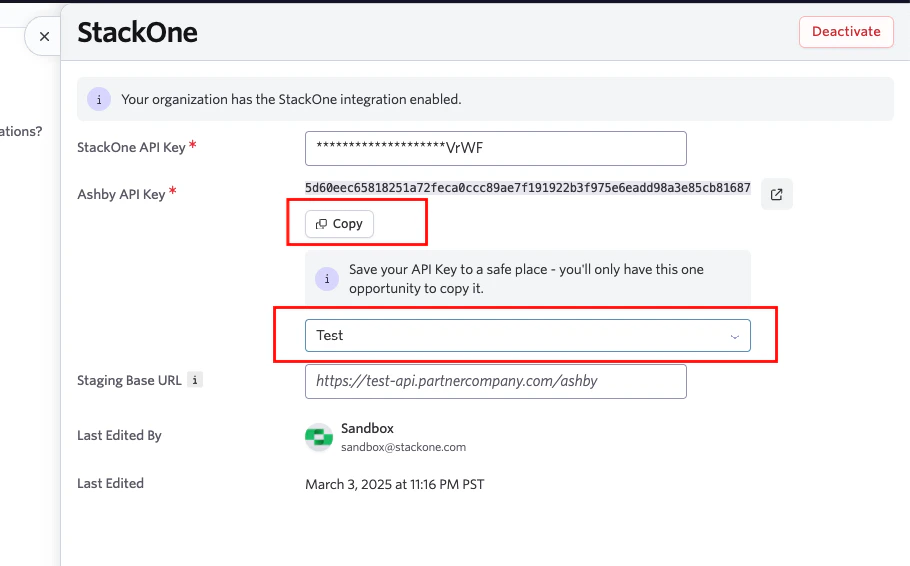
    Ashby API Key will be generated and displayed. Please copy your Ashby API Key as this is shown only once
    <Frame>
      <img className="rounded-md" style={{ margin: '0 auto', border: '1px solid #efefef' }} alt="Edit/View Assessment/Background check Status ID" src="https://mintcdn.com/stackone-hub-mintlify-faq-auth-1778741320/cy-y7wycMjlCcgtS/images/ashby-background-check/ashby-bcheck-6.png?fit=max&auto=format&n=cy-y7wycMjlCcgtS&q=85&s=bacdc3cf21abe313c830c91cf8cd8577" width="910" height="566" data-path="images/ashby-background-check/ashby-bcheck-6.png" />
    </Frame>
  </Step>
</Steps>

## Adding Background check to Candidate Pipeline.
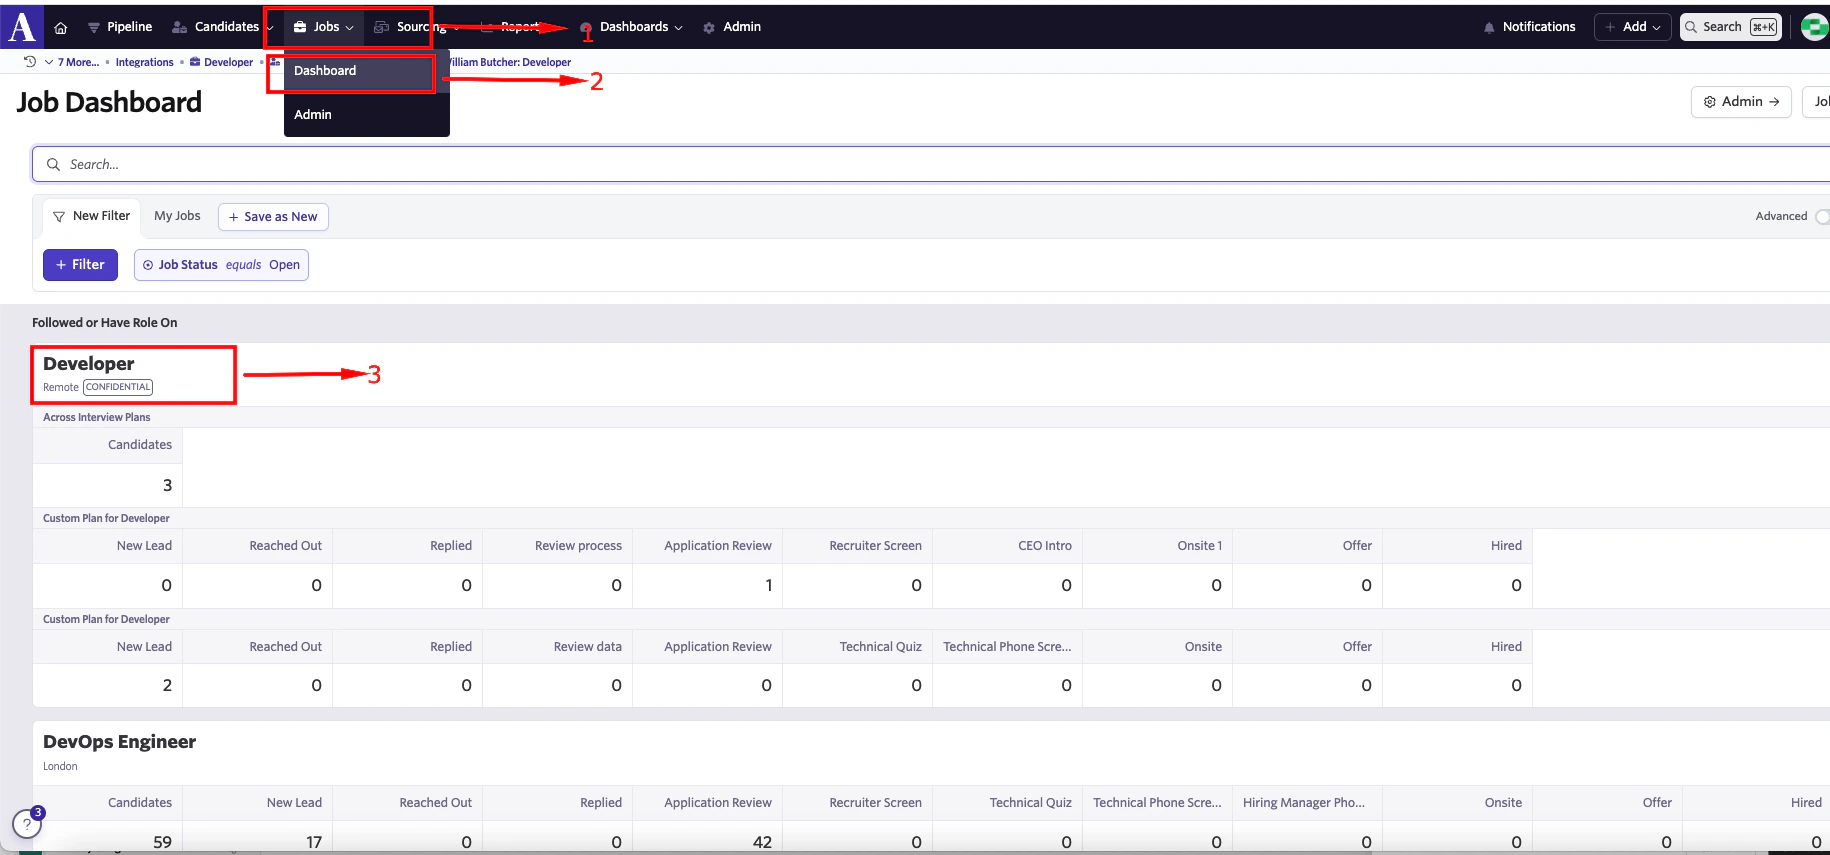
<Steps>
  <Step title="Navigate to your job dashboard and select a job from the job list">
    <Frame>
      <img className="rounded-md" style={{ margin: '0 auto', border: '1px solid #efefef' }} alt="Edit/View Assessment/Background check Status ID" src="https://mintcdn.com/stackone-hub-mintlify-faq-auth-1778741320/cy-y7wycMjlCcgtS/images/ashby-background-check/ashby-bcheck-7.png?fit=max&auto=format&n=cy-y7wycMjlCcgtS&q=85&s=ba1ca665aad92a219e4f119778ffd7df" width="1830" height="855" data-path="images/ashby-background-check/ashby-bcheck-7.png" />
    </Frame>
  </Step>

  <Step title="Select a candidate from candidate pipeline stage">
    <Frame>
      <img className="rounded-md" style={{ margin: '0 auto', border: '1px solid #efefef' }} alt="Edit/View Assessment/Background check Status ID" src="https://mintcdn.com/stackone-hub-mintlify-faq-auth-1778741320/cy-y7wycMjlCcgtS/images/ashby-background-check/ashby-bcheck-8.png?fit=max&auto=format&n=cy-y7wycMjlCcgtS&q=85&s=713eed3b9e9706a85b7a121f0f36dc34" width="1918" height="798" data-path="images/ashby-background-check/ashby-bcheck-8.png" />
    </Frame>
  </Step>

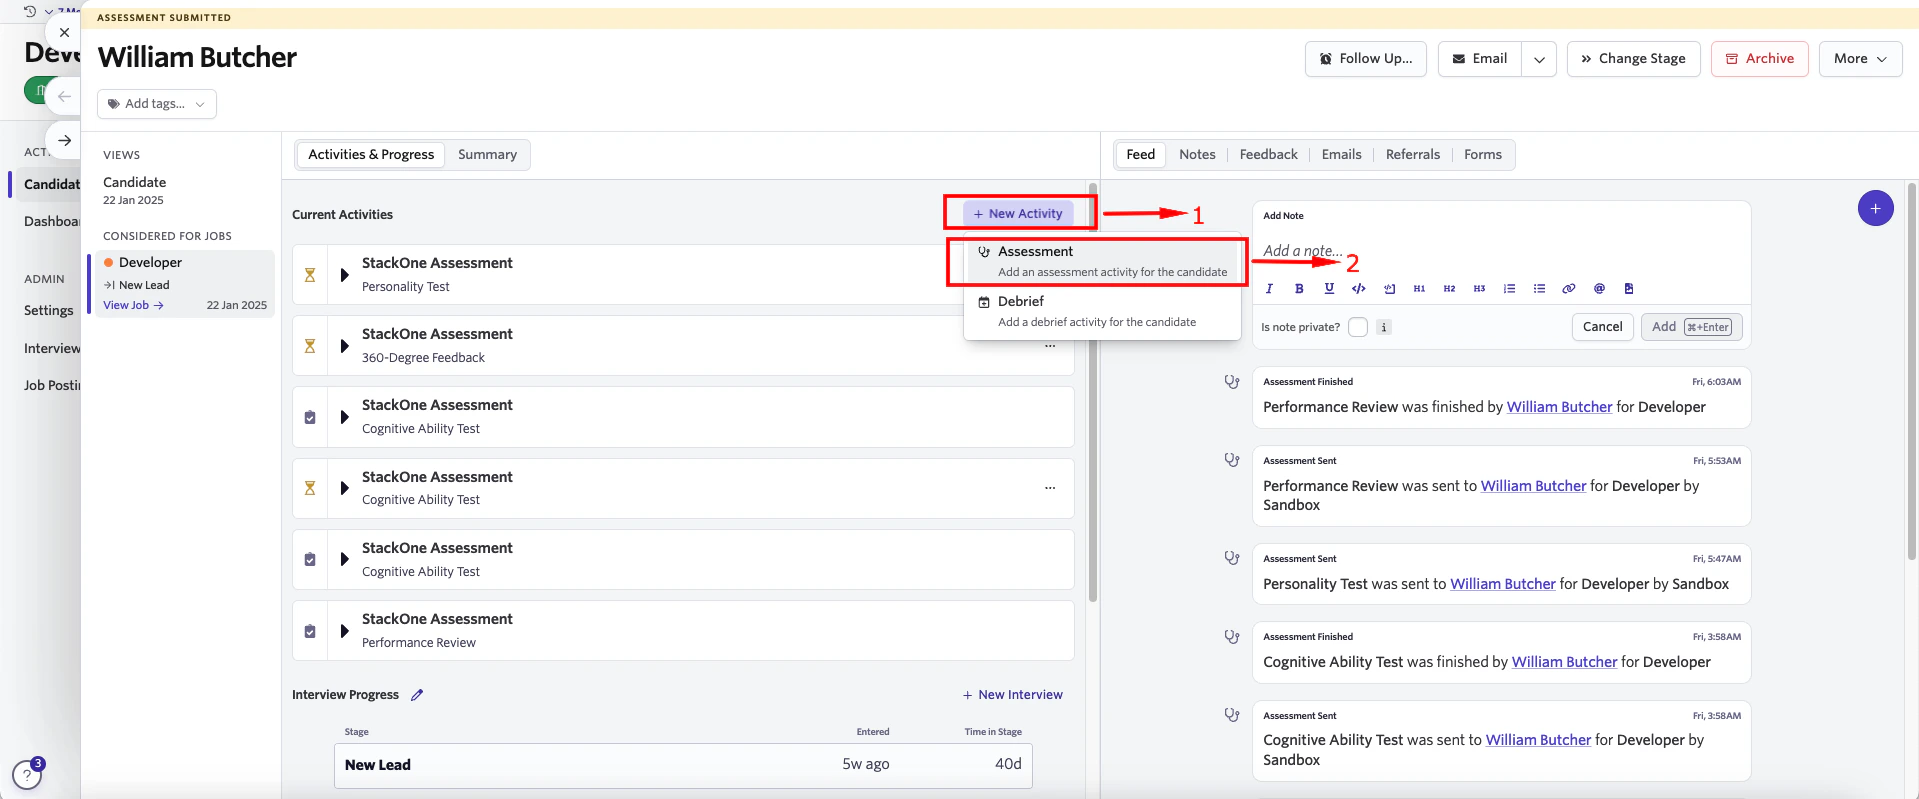
  <Step title="To select the background check tests">
    Click on `New Activity` to add an background check at this stage. Click on `Assessment` that appears after `New Activity` is clicked.
    <Frame>
      <img className="rounded-md" style={{ margin: '0 auto', border: '1px solid #efefef' }} alt="Edit/View Assessment/Background check Status ID" src="https://mintcdn.com/stackone-hub-mintlify-faq-auth-1778741320/cy-y7wycMjlCcgtS/images/ashby-background-check/ashby-bcheck-9.png?fit=max&auto=format&n=cy-y7wycMjlCcgtS&q=85&s=648ab9038eb26f0005dcd47b53219720" width="1919" height="799" data-path="images/ashby-background-check/ashby-bcheck-9.png" />
    </Frame>

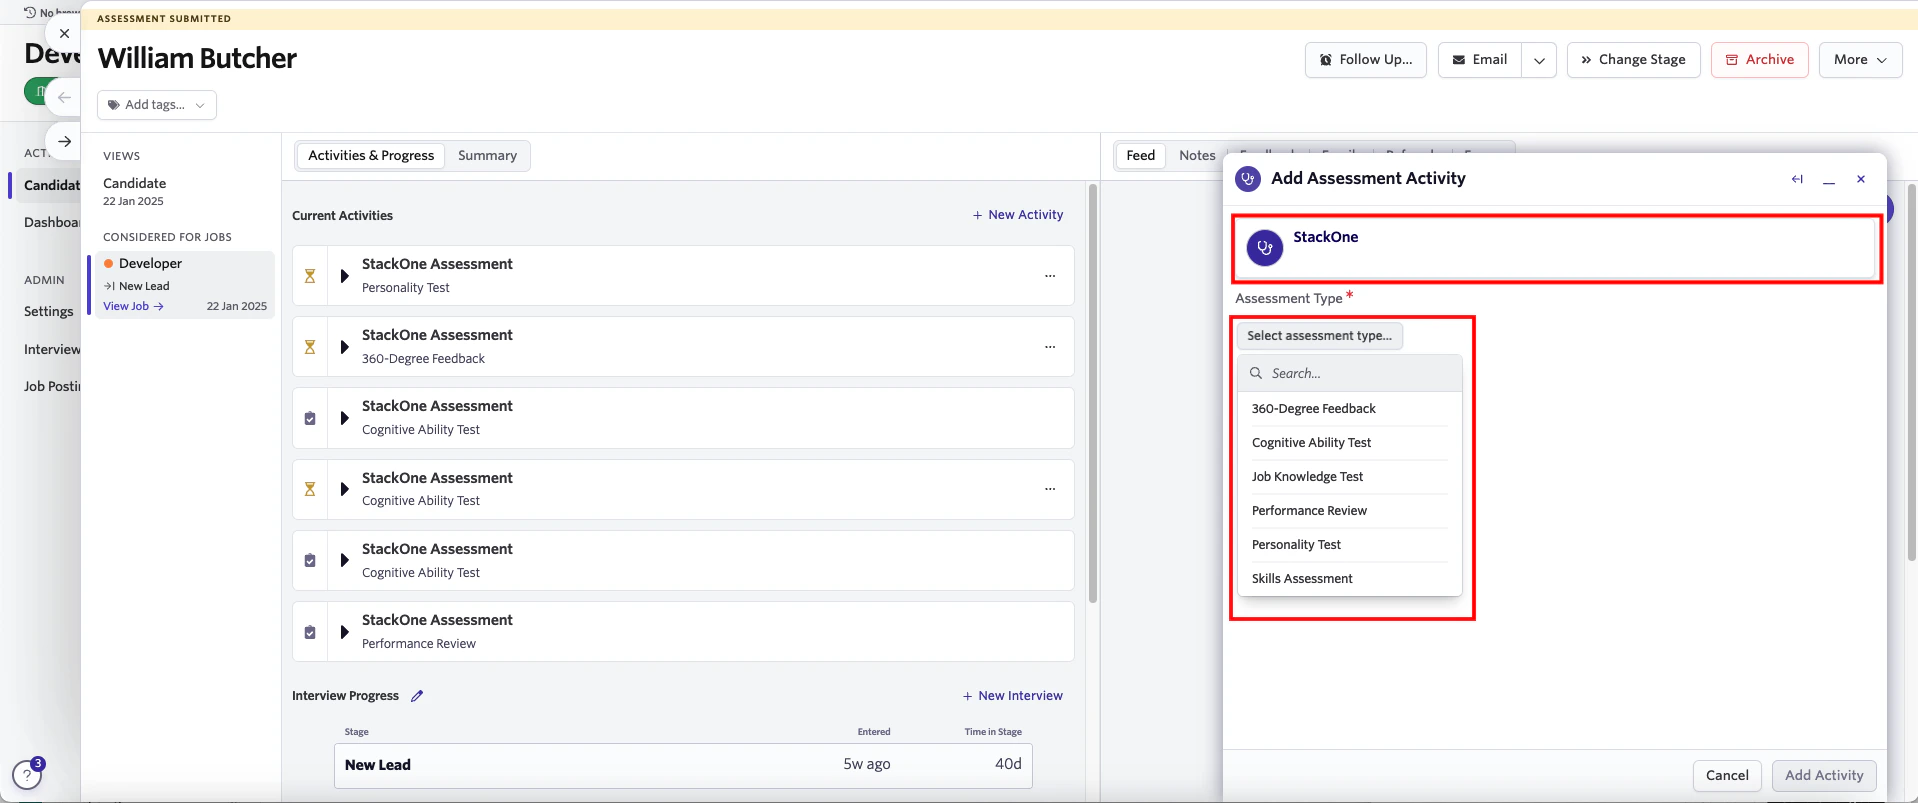
    You will be redirected to `Add Assessment Activity` pop up. Please click on the `Stackone` assessment in Add Assessment Activity. Select the `Assessment Type` from the dropdown list.
    <Frame>
      <img className="rounded-md" style={{ margin: '0 auto', border: '1px solid #efefef' }} alt="Edit/View Assessment/Background check Status ID" src="https://mintcdn.com/stackone-hub-mintlify-faq-auth-1778741320/cy-y7wycMjlCcgtS/images/ashby-background-check/ashby-bcheck-10.png?fit=max&auto=format&n=cy-y7wycMjlCcgtS&q=85&s=8a0b5d651636bddc3cf7dc739a3b27fa" width="1918" height="803" data-path="images/ashby-background-check/ashby-bcheck-10.png" />
    </Frame>

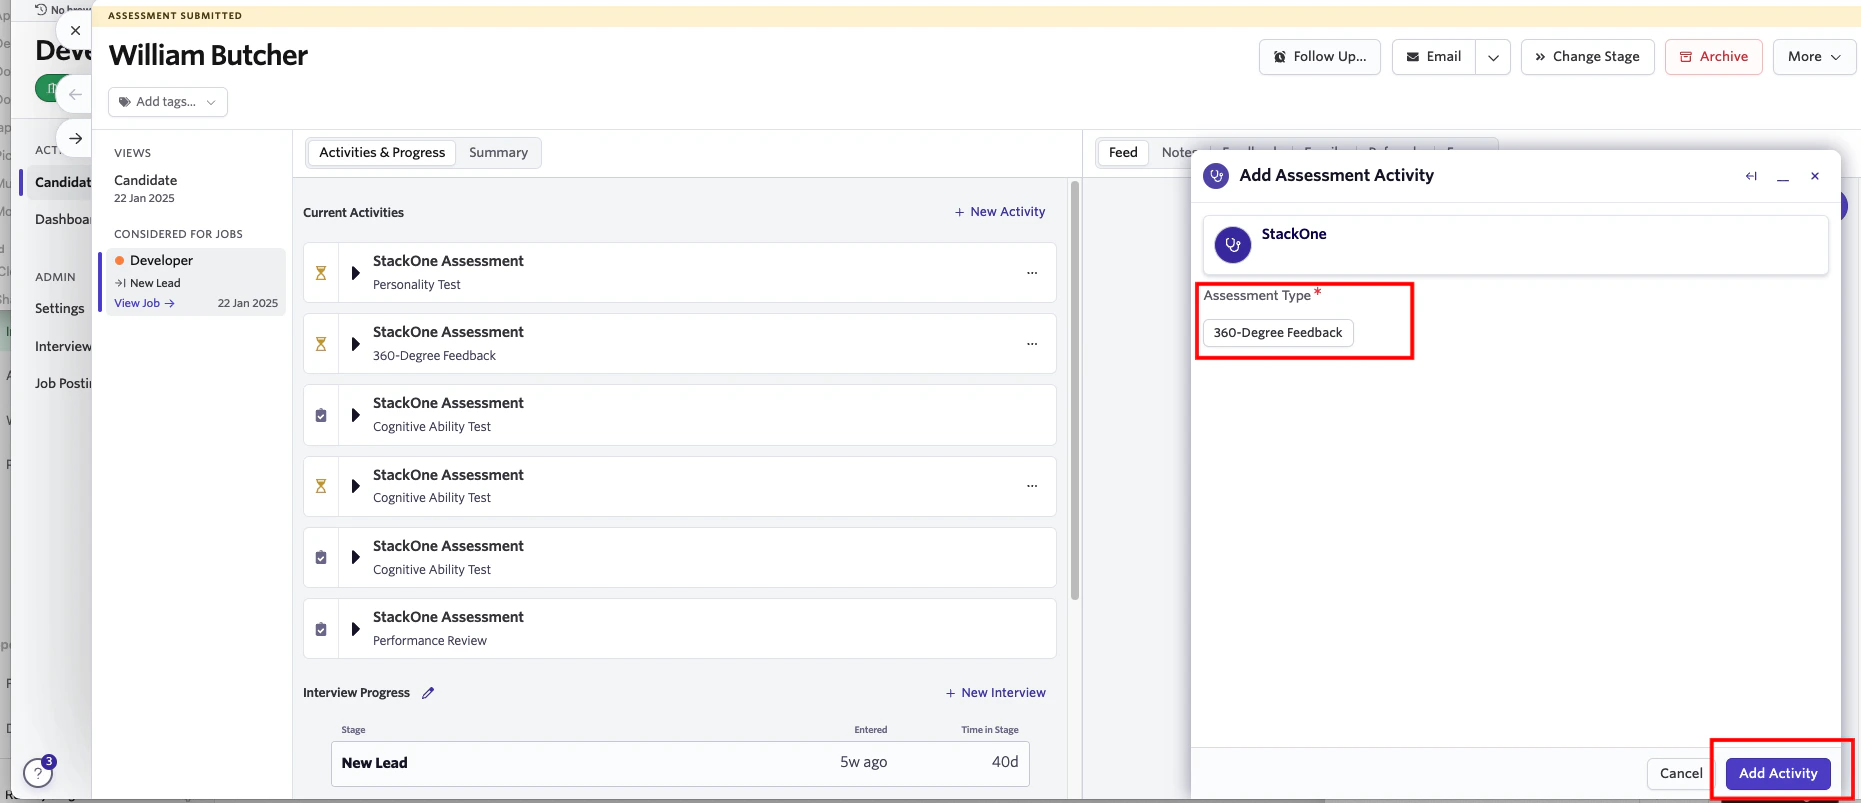
    Once selected, click on the `Add Activity` button at the bottom right corner of the` Add Assessment Activity`.
    <Frame>
      <img className="rounded-md" style={{ margin: '0 auto', border: '1px solid #efefef' }} alt="Edit/View Assessment/Background check Status ID" src="https://mintcdn.com/stackone-hub-mintlify-faq-auth-1778741320/cy-y7wycMjlCcgtS/images/ashby-background-check/ashby-bcheck-11.png?fit=max&auto=format&n=cy-y7wycMjlCcgtS&q=85&s=90e599b28864876397562a86c4e2a8d6" width="1861" height="803" data-path="images/ashby-background-check/ashby-bcheck-11.png" />
    </Frame>

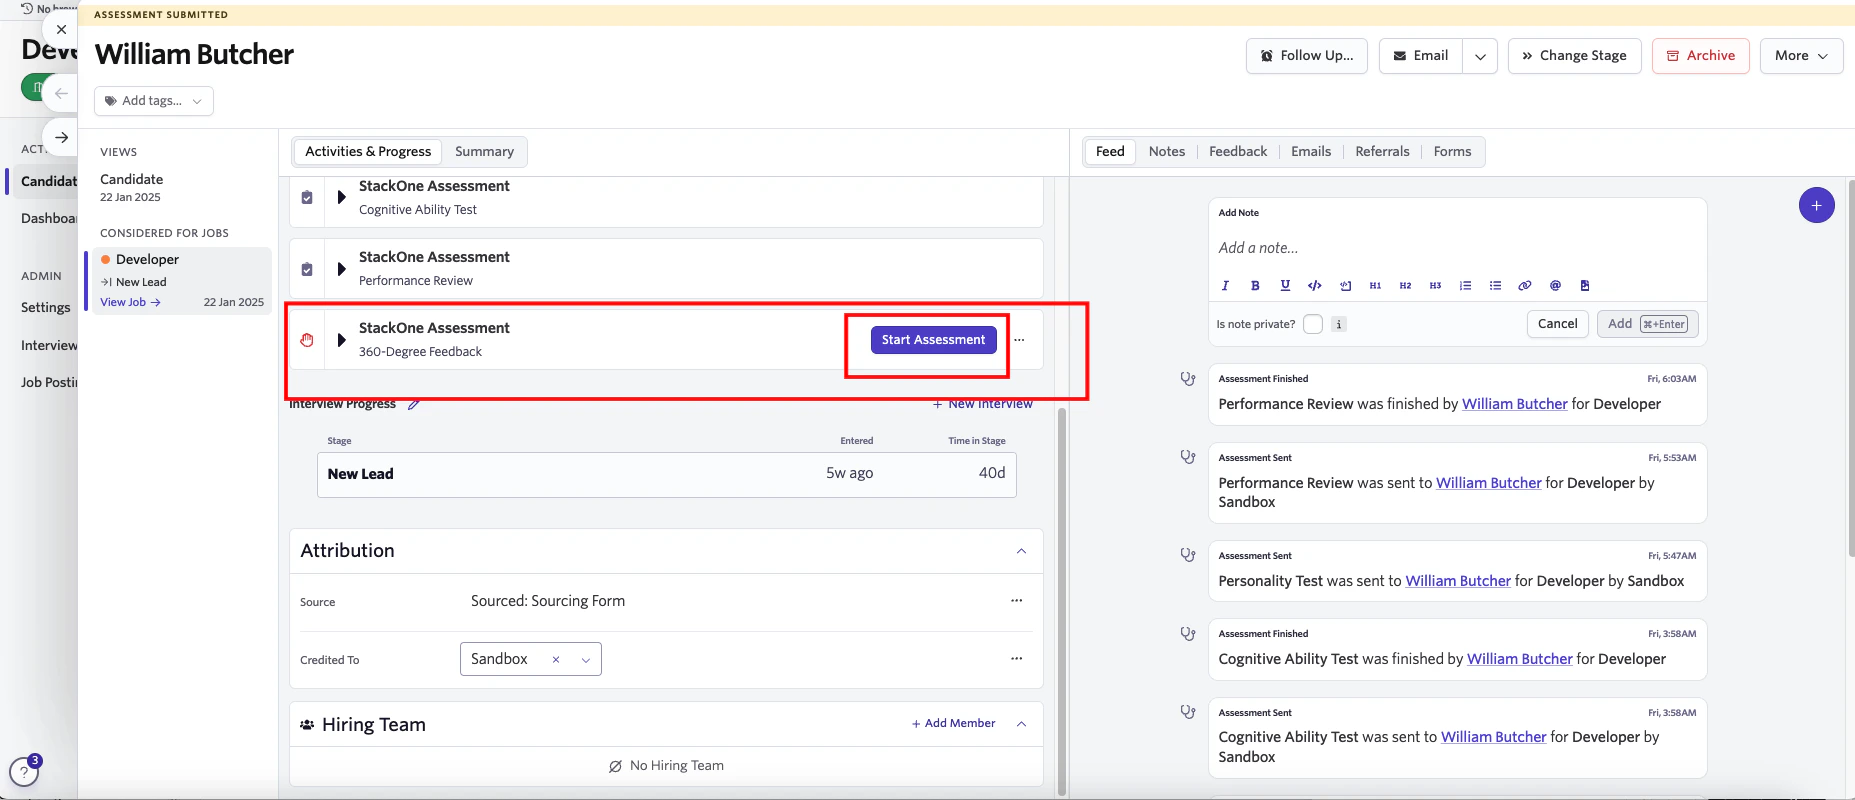
    You will now see that the background check has been added to the candidate profile with a `Start Assessment` button in the `Activity` section.
    <Frame>
      <img className="rounded-md" style={{ margin: '0 auto', border: '1px solid #efefef' }} alt="Edit/View Assessment/Background check Status ID" src="https://mintcdn.com/stackone-hub-mintlify-faq-auth-1778741320/cy-y7wycMjlCcgtS/images/ashby-background-check/ashby-bcheck-12.png?fit=max&auto=format&n=cy-y7wycMjlCcgtS&q=85&s=ebcee15405a997ea12180ebc70c9be43" width="1855" height="800" data-path="images/ashby-background-check/ashby-bcheck-12.png" />
    </Frame>
  </Step>
</Steps>

## Sending StackOne background check test to a Candidate

<Steps>
  <Step title="To send an background check test to the candidate">
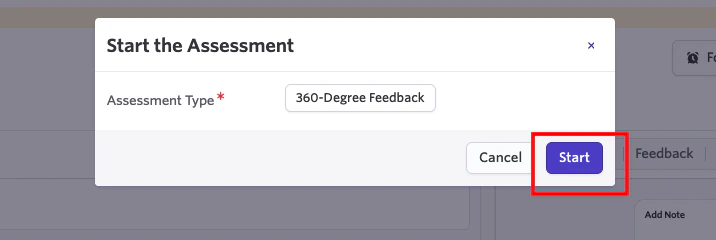
    Click the `Start Assessment` button in the Activity section of the selected candidate. A confirmation pop-up will appear, displaying the selected background check type. You can also modify the background check type using the dropdown list. Click `Start` to send the test.
    <Frame>
      <img className="rounded-md" style={{ margin: '0 auto', border: '1px solid #efefef' }} alt="Edit/View Assessment/Background check Status ID" src="https://mintcdn.com/stackone-hub-mintlify-faq-auth-1778741320/cy-y7wycMjlCcgtS/images/ashby-background-check/ashby-bcheck-13.png?fit=max&auto=format&n=cy-y7wycMjlCcgtS&q=85&s=41a577b1ef62c68caad3f0ed00257e12" width="716" height="240" data-path="images/ashby-background-check/ashby-bcheck-13.png" />
    </Frame>

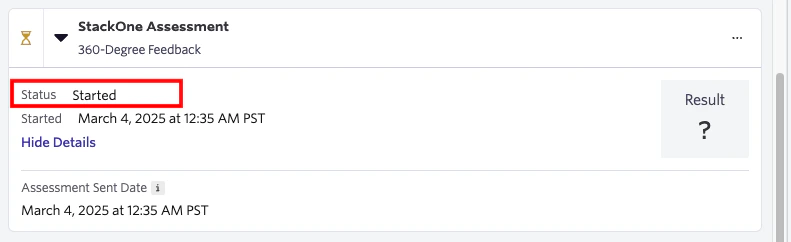
    The screen displays the background check status along with the date and time it was sent. Since the candidate has not yet completed the assessment, the result will remain pending.
    <Frame>
      <img className="rounded-md" style={{ margin: '0 auto', border: '1px solid #efefef' }} alt="Edit/View Assessment/Background check Status ID" src="https://mintcdn.com/stackone-hub-mintlify-faq-auth-1778741320/cy-y7wycMjlCcgtS/images/ashby-background-check/ashby-bcheck-14.png?fit=max&auto=format&n=cy-y7wycMjlCcgtS&q=85&s=78d97583fec33a814c1f9c5ed38d5ccc" width="791" height="242" data-path="images/ashby-background-check/ashby-bcheck-14.png" />
    </Frame>
  </Step>
</Steps>

## View Candidate’s Result in Ashby

<Steps>
  <Step title="To get the result details">
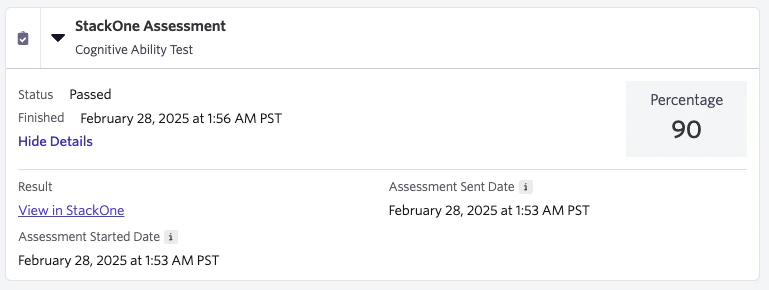
    A detailed result, along with a `Full Report link`, will appear once the candidate has completed the assessment
    <Frame>
      <img className="rounded-md" style={{ margin: '0 auto', border: '1px solid #efefef' }} alt="Edit/View Assessment/Background check Status ID" src="https://mintcdn.com/stackone-hub-mintlify-faq-auth-1778741320/cy-y7wycMjlCcgtS/images/ashby-background-check/ashby-bcheck-15.png?fit=max&auto=format&n=cy-y7wycMjlCcgtS&q=85&s=6f0a827bc1cb770bd8006f71582bdfc9" width="769" height="290" data-path="images/ashby-background-check/ashby-bcheck-15.png" />
    </Frame>
  </Step>
</Steps>

## Useful Links

<Card title="API Reference" icon="link" href="https://developers.ashbyhq.com/reference/assessmentstart">
  [https://developers.ashbyhq.com/reference/assessmentstart](https://developers.ashbyhq.com/reference/assessmentstart)
</Card>